There’s a seemingly endless array of sourdough bread recipes and techniques. I found the diversity overwhelming when I first started. Sourdough baking seemed complicated and regimented. But it doesn’t have to be. Baking a loaf of sourdough can be simple and flexible.
You don’t need special ingredients. Just flour, water and a little salt. You don’t even need to buy yeast. You can capture and cultivate your very own wild yeast – typically called a ‘starter’. A starter is a mix of flour and water teaming with wild yeast and bacteria.
How to create your own sourdough starter
To create your own sourdough starter from scratch, mix two cups of flour and 1.5 cups of warm water in a large glass bowl. Cover the bowl with netting and leave outside or on the kitchen bench with the window open.
Whisk at least twice a day.
Bubbles should eventually appear on the surface, indicating that you have captured wild yeast.
At this point, mix in a cup of flour and enough water to maintain consistency. Do this every day for up to a week until your starter is bubbly and a layer of foam forms on top.
Tip out some of your culture to make room when space becomes tight.
Store your starter in a jar (with lid placed on loosely) in the refrigerator and feed it each time you make a new loaf of bread.
Think of it as an ecosystem in a jar. With proper care, your starter culture should last forever.
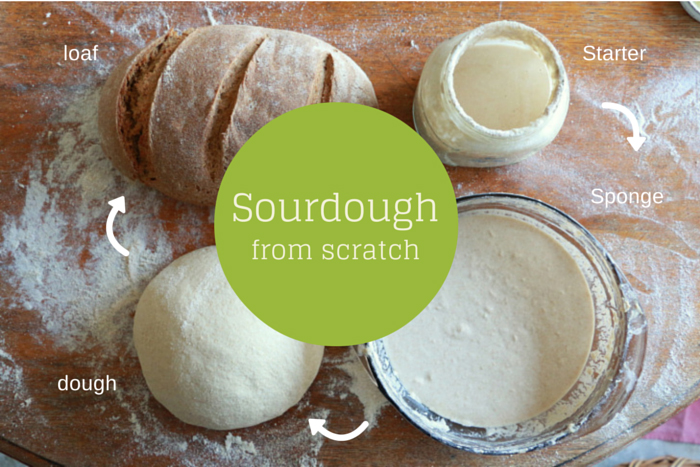
Here are the basic steps for a simple sourdough loaf
Step 1. Make a sponge and feed your starter
Pour one cup of starter into a large bowl. Mix in two cups of flour and enough water to return to a thick batter consistency. This is your sponge.
Before putting your starter jar back in the refrigerator, feed it. Add around three tablespoons of flour and enough water to maintain the batter consistency. Leave it on the kitchen bench for a couple of hours and then return it to the fridge.
Cover your sponge and leave at room temperature for at least two hours. (It will be fine on the bench for up to eight hours. If I havn’t found time to make dough within eight hours I simply feed it again, giving me another eight hours up my sleeve.)
Step 2. Make a dough
Add 3 to 5 cups of flour (depending on how large you want your loaf to be) and one teaspoon of salt to your sponge. My favourite flour is a mix of wholegrain wheat and rye.
Mix with your fingers and slowly add water until you end up with a sticky dough.
Turn out onto a floured surface and knead until smooth (at least 10 minutes).
Place dough in a bowl, cover with a damp tea towel and leave somewhere warm for at least a couple of hours.
Step 3. Shape your loaf
Form your loaf, tucking the edges of the dough underneath itself so that you have a smooth surface on top. Place on a tray covered with a sheet of baking paper (can be reused again and again) for a free form loaf, or into a loaf tin.
Cover with a damp tea towel and leave somewhere warm for at least a couple of hours.
A short prove will result in a fluffy loaf with a mild flavour. A long prove (for example 24 hours +) will produce a dense loaf with a sour flavour.
Step 4. Bake
Slash the top of your loaf using a sharp knife. Bake in a hot oven (200 to 250 degrees celcius) until your loaf is golden brown and sounds hollow when you tap its base (around 40 minutes).
Leave to cool on a rack for at least 20 minutes before slicing.
Experiment. Make mistakes. Learn. Enjoy.
Originally published in the Newcastle Herald Monday 13th October 2014.
Last week I wrote about lessons in simple living from sourdough baking.